
How to Replace the Brake Master Cylinder on Your Jaguar
 Replacing the brake master cylinder is a critical job for any DIY Jaguar owner. Proper installation and bleeding are essential to ensure your brakes function correctly.
Step 1: Bench Bleeding the Master Cylinder
Before installing the new or rebuilt master cylinder, you must bleed the air from it. If you skip this step, your brakes may feel soft or worse, fail entirely.
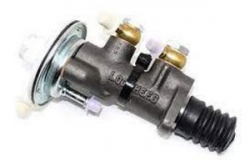
- Secure the master cylinder in a vise (gently, to avoid damage).
- Attach the provided plastic fittings and hoses from the rebuild kit to the output ports.
- Fill the reservoir with fresh brake fluid.
- Use a screwdriver or similar tool to slowly press the piston in and out until no more air bubbles appear in the hoses.
- Once fully bled, plug the ports to prevent air from re-entering before installation.
Step 2: Installing the Master Cylinder
- Remove the Old Cylinder – Disconnect the brake lines and unbolt the master cylinder from the brake booster. Be prepared for some fluid loss.
- Install the New or Rebuilt Cylinder – Secure it to the brake booster and reconnect the brake lines.
- Final Bleeding – After installation, bleed the entire brake system starting from the wheel farthest from the master cylinder.
ABS Considerations
- Jaguars with ABS (Anti-lock Braking Systems) use a brake actuator, which cannot be rebuilt – the entire unit must be replaced.
- 1989-1996 XJS models are known for ABS actuator failures. If your ABS system isn’t functioning correctly, we offer used ABS actuators with a warranty.
Need Parts?
Jagbits carries new and rebuilt master cylinders, along with rebuild kits, rebuild services, and other brake components for most Jaguar models.
By following these steps carefully, you’ll restore safe and reliable braking performance to your Jaguar. Let us know if you need any help choosing the right parts!